Rainbow Cookies (Italian-American Neapolitans, Venetians or Tricolore)
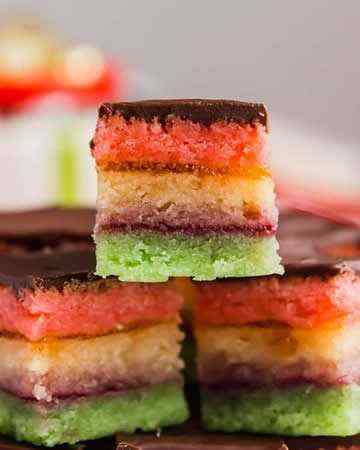 Italian Rainbow cookies are sometimes also called Neopolitans, Venetians, 7 Layer Cookies, Italian Flag Cookies and even Tri-Colour Cookies. If you're from New York, you'll remember growing up with these and finding them at every bakery. But you will not find these in Italy. Italian-American immigrants are credited with creating this almond-paste colourful cookie in the States. In Italian they call this cookie Tricolore (three colours) because of its resemblance to the Italian flag. Whatever you call them, they are so delicious and are a gorgeous addition to any cookie platter. They are perfect for Christmas and special occasions. These soft and buttery treats are chewy in the middle while slightly crispy on the outer edges.
4 large eggs, separated
1 cup sugar
1 (8 oz) can almond paste
2½ sticks (1¼ cups) butter, softened (10 oz or 285 g total)
1 tsp. pure almond extract
2 cups all-purpose flour, unbleached
½ tsp. sea salt
25 drops red food colouring
25 drops green food colouring
1 (6 oz) jar raspberry preserves, seedless, heated and strained
1 (6 oz) jar apricot preserves, heated and strained
7 oz bittersweet chocolate, unsweetened, chopped
Put oven rack in middle position and preheat oven to 350°F (180°C/160°C fan, Gas Mark 4). Butter a 9x13" baking pan and line bottom with wax paper, leaving a 2" overhang on 2 ends, then butter paper.
Beat whites in mixer fitted with whisk attachment at medium-high speed until they just hold stiff peaks. Add ¼ cup sugar a little at a time, beating at high speed until whites hold stiff, slightly glossy peaks. Transfer to another bowl.
Switch to paddle attachment, then beat together almond paste and remaining ¾ cup sugar until well blended, about 3 minutes. Add butter and beat until pale and fluffy, about 3 minutes. Add yolks and almond extract and beat until combined well, about 2 minutes. Reduce speed to low, then add flour and salt and mix until just combined.
Fold half of egg white mixture into almond mixture to lighten, then fold in remaining whites gently but thoroughly.
Divide batter among 3 bowls. Use a food scale to make sure the batters are even. Leave one bowl plain for the white bowl. Set the white batter bowl aside. Stir red food coloring into one and green food colouring into another. Chill green and white batters, covered. Pour red batter into prepared pan and spread evenly with offset spatula (layer will be about ¼" thick).
Bake red layer 8-10 minutes, until just set. (It is important to undercook. They'll look like they're not done, but a tester does come out clean.)
Using extra parchment paper overhang as "handles", transfer layer to a rack to cool, about 15 minutes. Clean pan, then line with parchment or wax paper and butter paper in same manner as above. Bake white layer in prepared pan until just set. As white layer bakes, bring green batter to room temperature. Transfer white layer to a rack. Prepare pan as above, then bake green layer in same manner as before. Transfer to a rack to cool.
When all layers are cool, invert green onto a parchment or wax-paper-lined large baking sheet. Discard paper from layer.
Heat up the apricot jam in a a small sauce pan for one minute to help it to spread easier. Spread over the green layer. The jam should be a very thin layer.
Invert white on top of green layer, discarding paper.
Heat up the raspberry jam in a small sauce pan for one minute to help it to spread easier. Spread over the white layer. The jam should be a very thin layer.
Invert red layer on top of white layer and discard wax or parchment paper.
Cover with plastic wrap and weight with a large baking sheet. I placed cookbooks on top of the baking sheet. Chill at least 8 hours.
Remove baking sheet and whatever you used to weigh it down and plastic wrap. Bring layers to room temperature.
Melt chocolate in a double boiler or a metal bowl set over a saucepan of barely simmering water, stirring until smooth. Remove from heat. Keep chocolate over water. (Alternately, you can do what I did: melt the chocolate about 3.5 oz at a time just to make sure it doesn't firm up between steps).
Trim edges of assembled layers with a long serrated knife. Quickly spread half of chocolate in a thin layer on top of cake. Chill, uncovered, until chocolate is firm, about 15 minutes. Cover with another sheet of wax paper and place another baking sheet on top, then invert cake onto sheet and remove paper. Quickly spread with remaining chocolate. Chill until firm, about 30 minutes.
With a serrated knife cut the cake into rows, then cut the rows into squares or rectangles. Be sure to use a wet towel to clean knife after each slice. Try to cut while they are still very cold. If you notice the chocolate melting too quickly after first slices, place in the refrigerator again to let it chill some more and then cut again. You could cut into 4 portions or cut into more like I did. I wanted the cookies to be about 1½" wide. The cookies should be cut about ¾" wide. If you have the patience and the time, do freeze the cake before slicing. I've done it both ways and it's much easier to slice when frozen.
Makes about 5 dozen cookies.
Cook's Notes:
- Store in a tightly covered container in a cool, dry place or in the refrigerator. They also freeze well.
- These take at least 11 hours from beginning to end, most of it inactive, but make sure you have a good 2-3 hour window.
- Please take the time to read tips above before you get into baking these delicious cookies.
Nutritional information:
Calories: 338kcal | Carbohydrates: 78g | Protein: 5g | Fat: 1g | Saturated Fat: 0.1g | Polyunsaturated Fat: 0.2g | Monounsaturated Fat: 0.04g | Sodium: 234mg | Potassium: 56mg | Fiber: 1g | Sugar: 40g | Calcium: 8mg | Iron: 2mg